Fall Cleaning

It’s well into October.

The days are still sunny and edging on warm, but the nights are quickly cooling and coming on sooner.  Leaves are just starting to make brilliant yellow carpets to crunch under feet not yet in Winter boots.  Loose buttons on coats begin eyeballing me ruefully, threatening to finally jump ship this season if I don’t take action.

And everywhere I look, it’s pumpkin spice thismaple that.  It’s apple spice crumbles (apple everything, really), brown butter, and, of course, a rogue peanut butter cookie.  Yes, some soups are appearing one by one, and the braises thus far are mostly in reference to Oktoberfest (which Americans should really be celebrating in a different way than with German beer), but everything is sugar and spice and everything nice.

And I’m not on board with that.


Typically, it’s Spring Cleaning.  Clean out the cobwebs of Winter, let the warm air in!  But me, I prefer Autumn for my Massive House-Cleaning.

I’d much rather cuddle into clean blankets when it’s cold.  I want to sweep away the dust that blew in through open Summer windows before closing them for six long months.  Like trees shedding leaves indiscriminately, I ruthlessly cull unused things from my home: clothes, makeup, cooking utensils, books, shoes, dying plants.

Fall seems to me a time of nesting, of preparing for the season of hibernation.  And people, I want my nest to be spotless.

Getting rid of stuff is one of my favorite things.  The feeling of donating boxes (boxes!) of items that took up precious space in my 500 square feet of home… there’s nothing like it.  Where did all that junk live?  What was I doing with it?  Where did it even come from?  Who cares!  It’s gone!, glorious empty space left in its wake.  The fewer items I have, the more valuable and important the remaining ones are, pared down to the most useful and most loved.

In the Fall, I want what I cook and eat to feel as uncluttered as the rest of my home.  Simple.  Easy.  Minimal.  Less stuff, more joy.

So the idea of feasting on heavy and rich braises, or of baking endless trays of cookies, pies, tarts, and cakes just seems wrong after I’ve spent hours or days scrubbing and polishing and vacuuming and eliminating junk.  It’s unbalanced.

My favorite food for such times (can we please not call it a detox? I prefer “hitting the reset button”.) is the leek.  For sheer simplicity, it doesn’t get any better than a dish of brown rice and leeks sautéed in a little olive oil.  Small portions, and let’s sit at the proper dinner table instead of hunching over the coffee table.  Eat slowly.

I like to eat this for as many meals as I can stand (yes, even breakfast), for as many days as I can stand, or until I feel like it’s done its job.  Usually, just a couple of days does the trick.  I feel calmer, food tastes better, it’s easier to listen to my body.  Everything feels lighter.  The reset button has been pushed, and I feel great.

Winter?  Bring it on.

Simplest Leeks

Yield: 2 to 3 small servings

This dish is surprisingly filling and satisfying, though it's hardly a recipe. These instructions are more about how to prepare a leek, which might seem intimidating if you've never used one. They grow in very sandy dirt, which tends to get trapped between the layers of leaves, and can be gritty if you don't rinse it all away. But do not let yourself be intimidated by a vegetable. It's easy, watch.

Ingredients

  • 2 to 3 leeks, 1 1/2 to 2 pounds
  • Olive oil, as needed
  • Salt
  • Freshly ground black pepper
  • Cooked whole grain of choice (brown rice, quinoa, buckwheat, farro, etc.)

Instructions

1. Rinse the leeks of any major dirt.

2. Cut off the tough dark green tops. Wash them well, and save in your stock bag in the freezer, if you're into that. Cut off the root ends and discard.

3. Cut the leeks crossways into two or three big chunks.

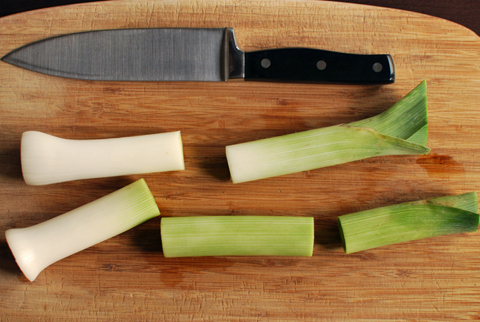
4. Cut each piece in half lengthwise.

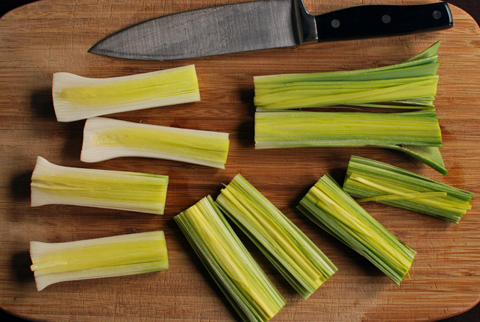
5. Rinse the leeks under cold running water. The pale white parts may not have any dirt to wash away, but the greener bits will certainly have dirt that might need to be rubbed away with your fingers.

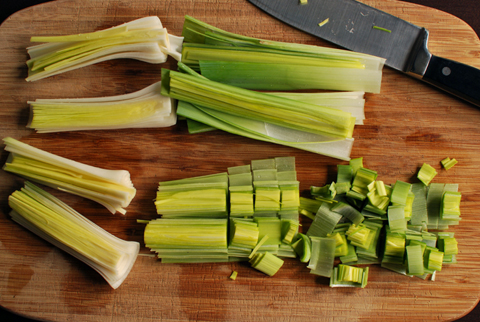
6. Roughly chop the leeks crossways into 1/2 inch pieces.

7. Heat a splash of olive oil in a large sauté pan over medium-high heat. Add the leeks, and toss to coat with the oil. Sprinkle with a pinch or two of salt and black pepper. Cook for a minute or two, or until they soften and begin to brown in spots.

8. Reduce the heat to medium-low, and cook until they have softened to taste. I prefer mine slightly al dente, and so only cook them for another minute or so. You can take them all the way to caramelized, if you like, but you'll end up with not very many to eat in that case.

9. Correct the seasoning if necessary, and serve over warm whole grains. A squeeze of lemon and a little parsley would not be out of place, though certainly not needed.

https://onehundredeggs.com/fall-cleaning/

Sichuan Pepper Tofu and Broccoli on Soba

I have a problem when it comes to following recipes.  Unless it’s a baked good, I appear to be almost entirely incapable of following those carefully-written instructions.

Sometimes, it works quite well.  I tweak an ingredient (or four), and all is well in the end.

But sometimes, my ego gets the best of me, and I decide that I know far better than some chef who wrote some cookbook that I’ve only been cooking out of all summer with rave results and who I should trust implicitly.  I read a recipe, and I say, “Well, that can’t be right.  I’ll just make some adjustments.”

And then, I end up with a huge pan full of gorgeous tofu and broccoli and soba that is smothered with a sauce that has the consistency of gritty, sandy dirt.  Actually, I think the dirt might’ve had a better texture.


Oh, and the house filled up with smoke, let’s not forget the house full of smoke.  So much smoke.

smoooooke

It took me all flippin’ night to cook it, too.  That’s the worst part, so much work for next to no payoff.

The intention was, of course, to post a recipe, but I don’t recommend anyone actually follow the recipe I ended up with.  I’m saving you much heartache.  It was not spicy enough, far too laborious, and lacked some sort of oomph.  Not to mention the rather, um, abrasive texture.

One major adjustment was made to mimic a dish I devoured recently, one that was redolent with the brilliant numbing tingle of Sichuan pepper.  I wanted to showcase the Sichuan peppercorns I ecstatically bought in response, and have been unsure of how to use ever since.

But apparently, the seeds must be painstakingly culled from the husks, as they have a (drum roll please) very gritty texture.  If anyone has helpful tips on how to use the things, I’m all ears.  Please.

Yes, I ate it, mostly out of spite.  No one else really did.

So, lessons learned:  Do not fry loads of tofu in a small apartment.  If you think it’ll be too much food, you’re probably right.  Research unfamiliar ingredients.  Trust the author.

If you have to utter the phrase, “Guys, this might actually be inedible,” just give up and order takeout.

Two Generous Salads

I don’t typically travel a heck of a lot.  Most of the time, you’ll find me within a five-mile radius of my kitchen.

But tomorrow (Thursday), I’m jetting off to my hometown, New Orleans.  First I’ll be attending the International Food Blogger Conference (and if you’re going too, I’d love to meet up with you!).  After that, I’ll be helping my family through one surgery (which I’m trying to not worry about obsessively).  I’m going away for eleven days, which isn’t very long, but it’s long enough that I couldn’t leave my sweetheart behind without some home-cooked food.

I have dug my own grave on this one, and absolutely crippled my boyfriend in the kitchen.  Not that he can’t or won’t cook, it’s just that… well, we have an unspoken understanding that dinner is probably going to be better if, you know, the professional chef cooks it.  He does help.

Also, I was only slightly afraid that he might subsist purely on cereal and take-out for eleven days if I hadn’t made a little something nutritious to tuck in the fridge.

Okay, fine.  If I’m honest, this was all a fine excuse for a blog post.

Drawing inspiration from my latest favorite cookbook and chef, Plenty, by Yotam Ottolenghi, I made for him two grain-based and vegetable-heavy salads, one with carrots, quinoa, lime, and cilantro, the other with quinoa, red rice, pistachios, and dried apricots.  These two dishes are exactly the kind of thing I could eat quite happily for the rest of my life, day in, day out.

The one word that comes to mind when I think about Chef Ottolenghi’s food is “generosity”.  Often, there isn’t just one type of grain, but two.  Or, occasionally, more.  (Shock!  Eyes widen!)  Flavors aren’t delicate or precious, but bold and effluent.  Herbs, in particular, are used with a hand so heavy it borders on leaden.  It just feels downright generous to pile mounds of herbs onto big heaps of vegetables and grains, and mix it all up in your largest bowl, using your entire arm to stir.

this is actually only half the cilantro

This is the sort of thing that’s been heavily influencing my cooking of late.  In-season vegetables, fresh herbs, whole grains, unrestrained flavors, always a hit of citrus.  This is also the sort of thing that is ridiculously good for you, which is great, because I could eat buckets of it.

I hope to see you at IFBC, but if I don’t, maybe one of these salads will make your weekend a little more generous.  Even if you just make it for your blog.


Carrot and Quinoa Salad with Almonds, Lime, and Cilantro
Inspired by Richard Blais, via Food & Wine Magazine
Makes 6 to 8 servings

I neglected to note how many pounds of carrots I used, but I know there were 10 of them, and they were on the smaller side.  If you love carrots, use more.  If you don’t, use less.  Either way, use your judgement.

3/4 cup whole almonds, toasted
1 cup quinoa
2 cups water
1 teaspoon kosher salt, plus additional as needed
10 medium-sized carrots
1 tablespoon olive oil, plus additional as needed
1 tablespoon minced or grated fresh ginger
1 clove garlic, minced or grated
Pinch of cinnamon
1/2 cup chicken stock
1 tablespoon unsalted butter
1/2 teaspoon Sriracha, or to taste
1 lime
1 bunch cilantro (yes, a whole bunch), chopped
1 can water chestnuts, drained and chopped
1 tablespoon furikake (optional; see this post for a recipe), or black sesame seeds
Salt and black pepper to taste

1.   To toast almonds, heat oven to 350º F.  Spread in an even layer on a sheet pan, and bake for 7 to 10 minutes, or until fragrant.  Chop roughly while still warm, and set aside.

2.  Meanwhile, rinse the quinoa in a fine mesh sieve until the water runs clear, swirling with fingers to help agitate the grains.  (This rinses off a natural coating that, when cooked, tastes bitter.)  Let drain a bit.

like so

3.  Place the quinoa in a medium saucepan, over medium-high heat.  Stirring constantly to prevent burning, toast the quinoa until fragrant, and grains dry and separate, about 3 minutes.  You should not hear any sizzling when the water has fully evaporated.  Add the water and salt, and bring to a boil.  Cover, reduce heat to low, and simmer for 12 minutes.  Remove from heat.  Place a clean towel between pan and lid (to help absorb excess moisture), and let stand 5 to 10 minutes before fluffing with a fork.

like so

3.  While quinoa cooks, prepare the carrots.  Peel, halve lengthwise, and chop into roughly 1 inch lengths (on a bias if you want to be fancy).  Mince or grate the ginger and garlic.

4.  In a large skillet with a lid, heat the olive oil over medium heat.  Add the carrots, ginger, garlic, cinnamon, and a pinch of salt.  Toss to combine, and cook until fragrant, about 3 minutes.  Do not brown.  Add the chicken stock, and cover the pan.  Cook until the carrots are just tender, 3 to 5 more minutes.  Remove the lid, and let any remaining liquid reduce until thick.  Remove from the heat.  Stir in the butter and Sriracha.  Let cool briefly.

5.  Zest and juice the lime into a large bowl.  Add the carrots, and toss.  Mix in the cooked quinoa, toasted almonds, cilantro, water chestnuts, and furikake (if using).  Taste, and adjust seasoning as needed with salt, black pepper, and olive oil.  Serve warm, at room temperature, or cold.

Red Rice and Quinoa Salad with Orange and Pistachio
Yotam Ottolenghi
Makes 6 servings 

Recipe can be found here.  I changed (practically) nothing, aside from wilting the arugula slightly so it would keep longer, and mixing it in.  Don’t be hesitant to use two grains in one salad; the variance in texture is delightful, and it’s scarcely any more trouble.

Also, I took some pictures of the ingredients, and I’m darn well going to use them.

Bulgur Wheat Salad with Sardines, Pomegranate, and Pistachios

This was going to be a Five Minute Photo Shoot, but it ended up being so good I had to share the recipe.  I recently threw this dinner together from bits and bobs hanging around the fridge and pantry, in one of those moments of desperation when you’ve got a packed larder but how is it there’s not a single thing to eat, so you start pulling ingredients out to see if anything happens to go together, and miracle of miracles, a common thread emerges.

Sprung from the places where things sometimes go to die: bulgur wheat, a tin of sardines, a handful of pistachios, some fainting mint, pomegranate seeds, and the omnipresent half of a zested lemon.  Sumac and cayenne rounded out the Middle Eastern vibe impeccably, and dinner was served.

Yes, I had pomegranate seeds sitting around in my fridge.  Yes, they’re desperately out of season.  *Gallic shrug*

Bulgur Wheat Salad with Sardines, Pomegranate, and Pistachios
Makes 2 servings

I know sumac isn’t a very common ingredient, but it made this dish.  The earthy, lemony spice really tied all the flavors together; so if you can find it, it’s worth the search.  If not, I understand.

1 cup water
1/2 cup bulgur wheat (medium to coarse)
1/4 teaspoon salt
2 tablespoons extra virgin olive oil (or to taste)
1 tablespoon lemon juice (from 1 lemon half)
1/2 teaspoon sumac, plus extra for garnish
Large pinch cayenne pepper
1 can sardines, packed in olive oil
1/3 cup pomegranate seeds
2 tablespoons toasted pistachios (chopped or left whole)
1 large sprig mint, leaves only, chopped
Salt and black pepper to taste

1.  Bring the water to a boil in a small saucepan.  Add the bulgur and salt, and stir.  Return to a boil.  Cover partially, and reduce heat to maintain a simmer.  Cook for 10 minutes, or until bulgur is tender.  Remove from heat, cover, and let stand for 5 minutes.

2.  Meanwhile, prepare remaining ingredients.  In a medium bowl, whisk together the olive oil, lemon juice, sumac, and cayenne.

3.  Lift the sardines from the oil, drain a bit on paper towels, and remove bones if necessary.  Using fingers, flake into large pieces into the bowl, and add remaining ingredients.

4.  Fluff bulgur with a fork, and stir lightly into the other ingredients.  Taste, and correct seasoning with salt, pepper, lemon juice, and olive oil as needed.  Serve warm, sprinkled with a generous pinch of sumac.

Oreganato Sauce, and the Fish Under It

Behold the whole, broiled branzini.

bad photo #1

Behold the aftermath of the whole, broiled branzini.

bad photo #2

Apparently, this is a perfect fish to grill or broil, as Michael Ruhlman notes in technical detail.  All I knew was that I had a dinner guest, seafood was in order, and at the store were the prettiest whole fish sitting out on ice, all clear eyes and red gills.  Parsley and lemon followed them into the cart, as always happens when I buy seafood.

At home, browsing through my newest cookbook, I happened upon an almost-too-simple recipe for something called Oreganato Sauce.  It only caught my eye because it was shown pairing with fish, but I decided to make it because I had all the ingredients on hand, and I had to put something on the table sooner or later.  Because I’m a contrarian, I had to use my newly-acquired Korean chili flakes, instead of the crushed red pepper flakes called for in the recipe.

The oreganato sauce practically made itself (after chopping the parsley and garlic), and rested on the counter while I busied myself with cocktail hour and conversation with good friends.  We got hungry, began preparing dinner in earnest, and not twenty minutes later were rewarded with some of the best fish I’ve ever had.  The silence during the meal – between usually-talkative people – proved me right.

The amazing thing about the sauce was how the character changed completely when cooked vs. when raw.  Branzini is almost trout-like in flavor, and it sang underneath the bright punch of the raw oreganato sauce, just as well as it did with the earthier flavor of the sauce that had been cooked on top of it.  Either way, it’s fantastic.  It’s like the difference between a fresh fig and a dried one; neither is like the other, but both are wonderful.

It’s hardly a recipe, but here’s how it’s done: one whole branzino per person (head-on and gutted, please), seasoned inside with salt and pepper, stuffed with parsley, thyme, and slices of lemon, and rubbed with a spoonful or two of the oreganato sauce.  Lay on a lightly-oiled sheet pan, pop under a very hot broiler, and cook until the skin begins to blister, turning once, about 4 or 5 minutes per side.  Serve with more oreganato sauce on the side, and plenty of bread to dip into the oil that will collect on your plate.

Again, here is whole broiled branzini.

And here is where whole broiled branzini used to be.

Any questions?

fish heads, fish heads, roly poly fish heads


Oreganato Sauce
Adapted from Simple Soirées, by Peggy Knickerbocker
Makes about 3/4 cup

This might seem like a bit of a throw-away recipe, but the sum of its parts is far more than the simplicity might belie.  It’s so, so, so good.  Use it on fish, on eggs, on quinoa or brown rice, on chicken, on goat cheese with crackers.  Anything.  Everything.

Though I call for Korean chili flakes, gochugaru, I know not everyone has the stuff lying around.  If you don’t have it, omit it, or use instead a pinch of any ground or crushed-up dried red pepper you like.  Gochugaru is less spicy than the red pepper flakes most Americans are used to, so use caution when substituting.

1/2 cup finely minced flat-leaf parsley
3 to 4 cloves garlic, minced finely
2 tablespoons dried oregano
1/2 teaspoon Korean chili flakes (gochugaru)
1/2 teaspoon kosher salt
Zest of 1 lemon, grated finely
Freshly ground black pepper, to taste
Olive oil, to taste

1.  Finely chop the parsley and garlic.  In a non-reactive bowl, mix with the remaining ingredients, adding olive oil until just moist, or to taste.  Let stand 30 minutes at room temperature before serving.

Avgolemono: Greek Rice and Lemon Soup

Originally, I intended to make this a Five Minute Photo Shoot, which explains the lack of “in progress” pictures.  But this dish was so fantastic, I simply had to share the recipe.

This thick Greek soup is quite simple, and shockingly good from a very few ingredients.  This, for better or worse, is one of those soups that really should be made with a homemade stock.  Sure, you can make it with store-bought; but with homemade, it becomes eye-rollingly, lick-the-bowl good.  (Ask me how I know this.)

Luckily for me, I needed to make some space in the freezer yesterday, so I had a pot of stock bubbling away on the stove.  There were also a few pitiful sacks of bulk-bin white rice knocking about in the pantry, loose ends of no more than 1/4 cup each.  Two stalks of celery, two lemons, some egg yolk, and 7 ounces of shredded chicken from the freezer didn’t seem like much of an arsenal to call on, but it all came together in one of the most satisfying dishes I’ve made in recent memory.

I think that’s the most delightful part of this recipe: it seems cobbled together from loose bits hanging around the kitchen, but the rapid metamorphosis into fine cuisine is stunning.  It was so good, I even forgot to grind black pepper over my dish (usually one of the first things I do at dinner) until it was almost gone, and the addition put it over the top for me.

Try this.  Try this tonight.


Avgolemono
Inspired by Gourmet Magazine and The Kitchn
Makes about 4 servings

I made this without measuring anything, and using bits and bobs found in the kitchen, but I’ve done my best to be as accurate as possible.  You can use any kind of rice or grain here, and I’m sure a mixture would be fantastic, but white rice is traditional, and that’s what I had.  Adjust the cooking time as necessary to cook brown rice or whole grains; add those in first if using a combination with white rice.  Toss in some lemon zest, mix up the herbs, add chicken or don’t; this soup lends itself very well to adjustments, so have fun.

If you don’t have homemade stock on hand, dice 1 small onion and the celery called for in the recipe.  Simmer them, along with 1 bay leaf, in store-bought stock for 30 to 60 minutes before proceeding with the recipe.  Discard the bay leaf before serving.  Also omit (or at least greatly reduce) the salt listed in the recipe, as most store-bought stocks will be plenty salty enough for this use.

1 quart homemade chicken stock, more or less
1/2 teaspoon kosher salt
3/4 to 1 cup white long grain rice (such as jasmine)
2 stalks celery, diced
2 to 3 egg yolks
7 ounces shredded cooked chicken (about 1 cup, optional)
2 whole scallions, sliced thinly
A few tender fennel fronds from the center of a fennel bulb, chopped (1 to 2 tablespoons, optional; parsley would also be good)
1/4 cup fresh lemon juice (from about 2 lemons), more or less depending on the tartness
Salt and black pepper, to taste

1.  Bring the stock to a boil in a medium saucepan.  Add the salt (if using), rice, and celery, and stir to combine.  Return to a boil, then lower the heat to maintain a moderate simmer.  Cover the pot with a lid slightly askew, to allow some steam to escape.  Cook without stirring for 10 minutes, or until the rice is at least al dente.

2.  If the rice has absorbed most of the stock, add some additional warm stock to thin the mixture a little.  Whisk the egg yolks in a medium bowl just to combine.  Slowly drizzle in a bit of the hot soup, whisking constantly.  Continue adding the soup slowly, whisking all the while, until about a cup of soup has been tempered in.  Add this back into the pot, along with the chicken.  Cook over medium-low heat until heated through and thickened a bit, taking care not to let it boil (which will curdle the eggs), just a few minutes.

3.  Stir in the scallions and fennel fronds.  Add 3 tablespoons of the lemon juice.  Taste, and add extra as needed to get a lemony flavor that isn’t overwhelmingly sour.  Correct seasoning to taste with salt and plenty of black pepper.  Serve immediately with crusty bread, and maybe a luxurious drizzle of olive oil on top.  A glass of crisp and dry white wine is never out of place with this.

Valentine’s Day, Round 2: Stuffed Braised Veal Heart

You’ll forgive me for not posting this recipe sooner, but I’ve only just recovered from Valentine’s Day.  Ruthie is a heck of a woman, I’ll tell you that much.

For anyone who enjoys organ meats, it’s pretty much a no-brainer to serve heart on February 14.  Forget Hallmark, this is the real deal.

Though you can find other types of heart, such as beef, pig, or sheep, veal heart is often regarded as the best, as it’s the most tender and packs the most flavor.  And, of course, only the best will do for my girl.  Despite the fact that it’s from a baby (a cow baby, but a baby nonetheless), veal heart is almost surprisingly big, sometimes nearly three or four pounds.  Smaller ones will obviously be more tender, so it’s worth asking for them.

this... this is not a good picture.

The flavor of veal heart is indeed beefy, but with decidedly gamey note.  This is not an unpleasant quality; if you’re fond of lamb, as I am, you’ll probably enjoy it.  As heart is a muscle, the texture is very much like any other beef muscle, though the muscle fibers are finer than other standard cuts.  Not to sound like a broken record, but overall, it’s extremely tender and hugely flavorful.

Inside the heart are chambers, which practically scream out to be stuffed with something.  Here, mushrooms, onions, bacon, and breadcrumbs are lightened with parsley, nutmeg, and a splash of Madeira.  The mixture, packed inside the hearts, makes for a pretty presentation when the hearts are sliced and fanned across a plate.

Because the heart muscle works so hard, it can be very tough if prepared incorrectly, like other much-used muscles.  Braising, then, is one key to softening the meat and rendering the best result.  (Unintuitively, though, a quick turn on a hot grill is also a good way to prepare veal heart; not so with beef heart, which must be slow-cooked.)  Madeira and red wine give a fantastic depth of flavor to the liquid, and match the robust tone of the meat.  To help retain moisture, bacon is wrapped around the hearts, which helps naturally baste the meat as it cooks.  The bacon was removed before serving, mostly for looks, but it’s perfectly fine to serve it as well.

Cubes of carrots, celery, and onion, braised with the stuffed hearts, not only help flavor the dish, but become a bold statement on their own.  The onions and celery largely melt away, but the carrots remain mostly intact, coaxed to a meaty richness in the pot.  They are a vibrant addition to the finished plate, don’t dare leave them out.

and don't forget the bouquet garni

Note: perhaps any eagle-eyed and offal-loving readers will notice that I’ve skipped over the second course from my epic Valentine’s Day menu, the Tripe Soup.  Because I didn’t substantially change the recipe when I made it, I’m not going to post it, but I will tell you where to find the recipe.  It’s in the Zuni Café Cookbook; and if you don’t have that book, I bet you know someone who does.  (Or, you know, try the library.)  The only change I made to the recipe was to omit the pancetta and the greens.  Now you know.

Stuffed Braised Veal Heart
Loosely adapted from Gourmet Magazine
Serves 4 to 6

For the stuffing, the onion and celery will cook best and most evenly if minced by hand, as that will provide a more consistent cut.  The mushrooms, however, may be chopped in a food processor if you like.  Leftover heart makes excellent sandwiches, especially with a little horseradish or coarse mustard.

2 veal hearts
Cold milk, as needed
3 slices (2 to 3 ounces) bacon, diced
4 ounces finely minced yellow onion (a generous 1/2 cup)
4 ounces finely minced button mushrooms (about 9 or 10, to measure nearly 1 1/2 cups)
2 ounces finely minced celery (about 1 large stalk)
1 large clove garlic, minced finely
2 ounces panko or fresh breadcrumbs (about 1 cup)
1/4 cup finely minced fresh parsley (stems reserved)
1/2 teaspoon fresh thyme leaves
1/4 teaspoon freshly-grated nutmeg, plus extra
Salt and black pepper to taste
2 tablespoons Madeira, or as needed, plus 1/2 cup
6 to 8 slices bacon (not thick-cut)
2 medium carrots, cut into 1/2 inch cubes
2 stalks celery, diced into 1/2 inch pieces
1 medium yellow onion, diced into 1/2 inch pieces
Bouquet garni (made of 2 bay leaves, two bushy sprigs of fresh thyme, 1/2 teaspoon black peppercorns, 1/2 teaspoon juniper berries, and the reserved parsley stems, all tied in a double or triple layer of cheesecloth)
3/4 cup red wine (such as Cabernet Sauvignon, or Shiraz)
Water or stock, as needed

1.  Clean the veal hearts by rinsing well with cold water.  Pat dry, and make a cut lengthwise from top to bottom, to open the heart like a book (do not cut all the way through).  Remove any hard external fat, stringy veins or arteries, valves, and blood clots.  If you like, or if the chambers seem too small to stuff, you can cut away the internal walls to make a large pocket inside the heart, reserving the meat.  Place the hearts in a gallon-size plastic zip-top bag, and cover with cold milk.  Squeeze as much air as possible out of the bag, and let stand at room temperature for 1 hour.  Meanwhile, prepare the remaining ingredients.

2.  To make the stuffing, heat a large sauté pan over medium heat.  Add the diced bacon, and fry until just browned.  Remove from the pan with a slotted spoon, and set aside to drain on paper towels.  (If you have reserved heart meat, dice it and cook it in the pan now.  Remove with a slotted spoon, and set aside to drain on paper towels.)  Either drain bacon fat from pan, or add additional oil or butter to the pan, to measure a total of 3 tablespoons of fat in the pan.

3.  Add the minced onion, mushrooms, celery, and garlic to the pan.  Toss or stir to coat with the fat, and cook over medium heat until translucent, about 3 minutes.  Add the panko and reserved bacon (and heart meat, if using), and toss until warmed through, about 1 minute.  Remove from heat, and add the parsley, thyme, and nutmeg.  Taste, and correct the seasoning with salt and black pepper to taste.  Add the Madeira 1 tablespoon at a time, until just moistened.  Keep stuffing warm.  Preheat oven to 325º F.

4.  Drain the hearts from the milk, and pat dry.  Sprinkle inside and out with salt, pepper, and a light dusting of freshly grated nutmeg.  Stuff loosely with the hot stuffing (you may have extra).  Wrap each heart with 3 to 4 slices of bacon, and secure with toothpicks.

5.  Meanwhile, heat a large Dutch oven over medium-high heat until hot.  Add hearts, and sear until golden brown on all sides.  Remove from the pan, set aside.  Some of the bacon fat should have rendered out into the pan; if not, add about 1 tablespoon oil or butter to the pan.

6.  Add the diced carrots, celery, and onion to the pan.  Cook, stirring, for 5 to 10 minutes, or until just softened.  Add 1/2 cup Madeira, and scrape the bottom of the pan to dissolve any browned bits that may have formed.  Add the hearts back in, along with the bouquet garni and the red wine.  Pour in enough water (or stock) to come about halfway up the hearts.  Bring the liquid back to a simmer.  Cover and transfer the pot to the oven.

7.  Braise the hearts for 1 hour, turning them over halfway through the time.  Uncover the pot, turn the hearts over again, and cook 30 more minutes, or until the internal temperature of the hearts reaches 135º F.  Remove from the oven, and let cool, uncovered, for about 3o minutes.  If the braising liquid looks thin, remove the hearts to a plate, and reduce over medium-high heat until thickened.

8.  To serve, slice hearts crossways.  Discard the bacon if you like, or serve it if you like.  Serve slices with some of the flavorful braising liquid napped over the top, with some of the vegetables from the pot alongside.

Wheat Berries with Radishes and Pecans; Or, a Winter Trip to the Farmer’s Market

Here in Chicago, the granddaddy of all farmer’s markets is the Green City Market, the only market to stay open all year round.  If you’re interested in local, sustainable, organic, farm-direct food (and we certainly all are, am I right?  Every meal, right?), you’re bound to end up shopping at Green City for most of your food.

Their rigorous standards for their vendors guarantee that everything is as it appears, that you actually are buying those apples or tomatoes from the nice lady or man who grew them, not from a re-seller.  And in the depths of Winter, when every other farmer’s market has shut down, Green City remains not as a deplorable sole option with a captive market, but as glamorous and worthy a destination as it is any other time of year.

too cold for most markets

Green City Market recently ran a photo essay contest, in which they invited food and photography junkies to shop at the market on a particular date, cook the food at home, and share the photos of the whole experience.  I decided to participate on a whim, mostly because any excuse to practice and improve my photography skills is probably good for me.

You can see the photos I entered, along with all the other entries, on this site they’ve set up.  If you like, you can rate each entry by clicking on the stars at the top of each one.  And remember, thumbnails rarely do justice, so click on each photo to see it full-size.

As there was a limit to the number of pictures one could submit, I had to whittle down the over 100 photos I took that day, so I’m posting some extras here.  And as a special bonus to all my lovely, lucky readers, below you’ll find the recipe I created to showcase the bounty I brought home from the market.

you can't pay someone enough to shell pecans for you. these are from three sisters garden.
excellent cannelés from floriole bakery
floriole bakery
heritage prairie farms
genesis growers
genesis growers
genesis growers

Don’t forget to check out the rest of the pictures from this contest!

Wheat Berries with Radishes and Pecans
Serves 4 to 6

This recipe has a lot of different steps, true, but they are all accomplished in the time it takes the wheat berries to cook.  Even better, you only use two pans: one for the wheat berries, one for every other step (with no washing-up required in between).  The flavors here are Spanish-inspired, with smoked paprika, thyme, Sherry, and anchovy; the chewy wheat berries soak them all up with gusto. This dish would be great any time of year, warm in the Winter, and cold in the Summer.  We ate this as a main dish, but it would also be a special side dish for any simply-prepared meat or poultry.

For wheat berries:
6 cups chicken stock or water
2 cups wheat berries, rinsed and drained
1 teaspoon salt
3 anchovy fillets packed in oil, drained
1/4 cup olive oil
1 tablespoon fresh thyme
1 tablespoon Sherry vinegar
1 tablespoon fresh lemon juice (zest it first!)
1/4 cup (packed) chopped parsley
3 scallions, chopped
Salt and black pepper, to taste

For anchovy-toasted pecans:
3 anchovy fillets packed in oil, drained
1 tablespoon butter
1 cup raw pecans, chopped roughly
Salt, to taste

For smoked paprika breadcrumbs:
1 scant tablespoon butter
1/2 cup panko
1/4 teaspoon smoked paprika
Zest from 1 lemon
Salt, to taste

For sautéed radishes:
2 to 3 teaspoons butter
1 bunch radishes (about 1 pound), cut into quarters
Salt and black pepper, to taste

Optional finish: fried or soft-boiled eggs

1.  Bring the chicken stock or water to a boil in a saucepan over high heat.  Add the wheat berries and salt, and return to a boil.  Reduce the heat to low and simmer, covered, until wheat berries are tender.  Depending on the type of wheat berry, this may take anywhere from 45 to 90 minutes; taste occasionally to determine doneness.  Add additional liquid if the pot begins to dry out before the wheat berries are cooked.  When fully cooked, drain wheat berries of any remaining liquid if necessary.

2.  Meanwhile,  heat a skillet over medium-low heat.  Add the anchovy fillets and cook, stirring, until broken up, just a minute or two.  Scrape into a large, non-reactive bowl, and whisk in olive oil.  Let cool briefly.  Add thyme and set aside.  Don’t bother washing the skillet.

3.  While wheat berries finish cooking, make the remaining accompaniments.  To make the toasted pecans, heat the same skillet over medium heat.  Add the anchovy fillets and cook, stirring, until broken up.  Add the butter, and let melt.  Toss the pecans in, and stir often until fragrant and toasted, about 5 minutes.  Sprinkle with a little salt.  Remove to a plate to cool.  Wipe the skillet out with a paper towel if necessary to remove any dark or burnt bits that may remain, but don’t bother washing it.

4.  Heat the same skillet over medium-high heat.  Add the butter, and melt.  Add the panko, and toss until evenly coated with butter.  Cook just until beginning to turn golden brown.  Remove from heat, and stir in the paprika, lemon zest, and a pinch of salt.   Transfer to a bowl.  Don’t bother washing the skillet.

5.  Heat the same skillet over medium-high heat.  Add the butter, and melt.  Add the radishes and sauté until cooked to desired doneness, 2 to 3 minutes for al dente, slightly spicy radishes, or up to 8 to 10 minutes for softer, less peppery ones.  Remove from the heat and set aside.

6.  To finish, add the Sherry vinegar, lemon juice, parsley, and scallions to the flavored olive oil in the large bowl.  When the wheat berries are fully cooked, drain if necessary.  Add to the bowl while still warm, and toss with the dressing.  Let stand 5 minutes or so to absorb some of the dressing.  This is a good time to fry or soft-boil an egg (follow these directions, but let stand only 4 minutes) if you’d like one; a runny egg yolk is highly recommended here.  (If you’re frying an egg, there’s no reason you can’t use the same skillet again.  Bonus.)

7.  Toss the wheat berries with the toasted pecans and sautéed radishes.  Serve each portion topped with an egg (if using) and a heavy-handed sprinkling of paprika breadcrumbs on top.  Leftovers keep quite well in a refrigerator for up to a week, and are even better the second and third day.

Chiles Rellenos; Or, How To Get Rid of Some Extra Luck

Every New Year’s Day, like a good Southern girl, I cook up a large batch of luck and money.  That is, I fix a huge pot of black-eyed peas (for luck), with a side of cabbage (for money).  I invite everyone and prepare enough to feed an army of hangovers.  And every year, hardly anyone manages to drag themselves through the cold to our remote neighborhood, except for a brave few stragglers.

Sigh.

This, in turn, means that every year, I have enough leftover black-eyed peas to last until practically next year.  This year was no exception.  And delicious and fortuitous though they may be, after eating them for six days straight, they start to wear a little thin.  Or, more correctly, if I had to choke down one more black-eyed pea, luck or no luck, I might scream.

With a packed-full freezer prohibiting long-term storage of the remaining glut (what on Earth is even in there?), the only option was to get creative.  Since we had been drowning our plates of leftovers in jalapeño-based green Tabasco sauce, and because I’m obsessed lately with poblano peppers, I settled on pea-filled chiles rellenos.

It’s traditional to fry the filled chiles in an airy, whipped egg white batter; but as January is the most ascetic month, an unadorned and healthier baked version was more in order.

I’m not a proponent of unnecessary gadgets in the kitchen, but there’s one particular item that I never get to use enough.  I know it’s not in everyone’s arsenal, but I couldn’t resist pulling it out to char the peppers.

oh yes

The rationale was that the propane torch would char the skin more evenly than the broiler (which it did), it would leave the flesh itself less cooked and therefore holding its shape better (which it also did), and be entirely delightful to use (which it always is).

Unfortunately, it didn’t really work as well as intended.  The small, though agile, flame handily blackened the skin, but made it fairly difficult to peel off, even with the aid of paper towels (I dared not try rinsing it off with water, for fear of losing flavor in the process).  And yes, the flesh remained firm and resilient, but it never really achieved that seductive sweetness of a softer and more thoroughly-cooked roasted pepper.  Next time, skip the power tools and go with the tried and true method of using a broiler.

The filling was a blend of the aforementioned black-eyed peas and an equal measure of crumbled queso fresco, to add richness.  Any soft, mild, melting cheese is appropriate here, and practically requisite; I don’t think I’ve had a chile relleno yet that didn’t include a significant amount of cheese melting seductively under the spicy green cloak of poblano.

ugly but good

For a sauce, I wanted a sharp acidity to counteract the relative sweetness of the roasted poblanos and the creamy peas; tomatillos were a natural fit.  Suppressing a natural urge to char the paper-clad darlings, I blended up a vibrant raw salsa, brightened with celery, onion, cilantro, and lime.

it looks like it'll never work...
...but then it always does.

A batch of polenta cooked in chicken stock anchored the whole dish, and provided a bed to soak up any errant juices.  I simply had to include corn, since I’m a sucker for cornbread with any kind of peas or beans, not to mention how beautifully cornmeal and green peppers play together.

The final dish was exactly what I needed: spicy, bright, creamy, even a bit glamorous.  After the previous six nights of dowdy dinners, those chiles rellenos looked like Dolores del Río.  Most appealing of all, of course, I didn’t have to endure any more ghastly plates of plain black-eyed peas.

Lucky me?  I should say so.  Now I just need that lucrative cabbage to kick in….

Black-Eyed Pea Chiles Rellenos with Raw Tomatillo Salsa
Makes 6

Do be careful with the poblano peppers, and consider wearing rubber gloves to deal with them, something I usually obstinately refuse to don.  They aren’t quite as spicy as a Serrano or jalapeño, but after seeding six of them, they can still leave plenty of capsaicin in your fingertips.  I discovered this after replacing a fallen-out contact lens the next morning, a painfully tearful lesson.  Someday, I may learn.

The tomatillo salsa has an unusual but optional ingredient: cocktail bitters.  In some sauces, I find that bitters help round out the flavors, just as they do in cocktails.  Magic!  If you don’t have any, they can certainly be left out; in that case, the longer you can let the salsa sit, the better.  It’ll be much better the next day anyway.

For the raw tomatillo salsa:
12 ounces tomatillos (about 8 to 10), paper removed, and rinsed
1 small white onion (1/2 large onion)
3 ribs celery
1 large clove garlic
1/2 to 1 cup cilantro, packed
Juice of 1/2 lime (about 1 tablespoon), or to taste
3 dashes Peychaud’s bitters (optional)
Salt and black pepper, to taste

For the chiles:
6 poblano peppers
2 cups leftover cooked black-eyed peas (or canned), drained of as much liquid as possible
2 cups crumbled queso fresco (or queso chihuahua, jack, mozzarella, or any other mild and soft cheese), about 8 ounces
Salt and black pepper, as needed

For the polenta:
4 cups chicken stock (or water)
1 teaspoon salt
1 cup polenta or coarse cornmeal (preferably stone-ground)
1 bay leaf

1.  To make the tomatillo salsa, cut the tomatillos into quarters, and roughly chop the onion and celery into 1 inch pieces.  Place all ingredients except salt and pepper into the jar of a blender.  Process until smooth.  Taste, and correct seasoning with salt, pepper, and lime juice.  Transfer to a bowl, and let sit at least 1 hour.

2.  To make the chiles rellenos, preheat the broiler to high, and position a rack as close to it as possible.  Place the poblanos on a rimmed baking sheet, and broil until charred and well blackened.  Turn each poblano as necessary to blacken evenly.  Remove from oven, and place peppers in a plastic or paper bag, sealing it tightly.  Let rest 10 to 15 minutes.  Turn the oven to 375º F, and position a rack in the middle of the oven.

3.  Meanwhile, combine the black-eyed peas with the crumbled cheese.  Season to taste with salt and pepper if necessary.  Set aside.

4.  For this step, wear rubber gloves, unless you’d rather not touch your face for two days.  Remove the peppers from the bag, and gently peel off the blackened skin, which should come off easily.  Make a single slice lengthwise into each pepper (if the pepper has split open, use that side).

do as I say, not as I do: wear gloves

Using kitchen scissors, carefully cut away the seeds and membranes.  You may need to make a short crossways cut close to the stem in order to fully access the seeds.

all them seeds gotta go

Remove and discard as many seeds as possible, using your hands.  Do not ever rinse peppers after roasting, as that washes away much of the smoky flavor that has developed.

5.  Fill each pepper with as much of the black-eyed peas as it will allow, taking care to not overfill and rupture the pepper.  Close the pepper with toothpicks, if desired, and place again on the rimmed baking sheet.  Wash your hands thoroughly if you’ve touched the peppers (particularly the insides) with your bare hands.

6.  Bake the filled peppers at 375º F for 15 to 20 minutes, or until warmed through, and cheese is melty.

7.  Meanwhile, make the polenta.  Bring the chicken stock to a boil in a medium saucepan.  Add the salt.  Slowly add the polenta, whisking as you pour it in order to prevent lumps.  Add the bay leaf.  Reduce the heat to medium-low, and simmer until tender, whisking occasionally.  This will take between 15 to 40 minutes, depending on the coarseness of the grain used.  Remove the bay leaf.

8.  To serve, spread the polenta on a plate.  Top with a warm chile relleno, and garnish with tomatillo sauce.  A cold beer on the side doesn’t hurt things one bit.

to pick good tomatillos, make sure they fill out or even burst through their papery wraps, like this little guy

Cranberry Beans Two Ways: Part II

As mentioned in my last post, I recently brought home a couple of pounds of fresh cranberry beans.  But, having never prepared cranberry beans before (or any fresh beans, for that matter), I turned to my cookbooks and to the internets for help.

In looking through recipes, one in particular stood out like a sore thumb.  From Dennis Cotter’s book Wild Garlic, Gooseberries, and Me came something (via 101 Cookbooks) that looked healthful, fresh, and completely unique: a baked cranberry bean and winter squash mole.

I’m familiar with mole sauces served with meat, or most commonly chicken; but I don’t think I’ve ever seen a mole with vegetables.  And here, of all fantastic things to combine, were cranberry beans, winter squash, chilies, nuts, and chocolate.

Yes, please.

As luck would have it, I just so happened to have a small butternut squash sitting on my counter, though any similar winter squash would certainly work here.  And just because I’m indulgent like that, and because I had some, I used a bit of rendered bacon fat to sauté the onion, celery, chilies, and garlic that became the base of the sauce.  It lent a gorgeous hint of smoke to the robust dish, as did the spot of Bourbon I deglazed the pan with.

I didn’t have any of the 70% chocolate specified in the original recipe, but the block of unsweetened chocolate in my pantry seemed close enough.  The resulting sauce was just a touch too bitter, too earthy for my tastes.  A squeeze of honey, however, and the sauce snapped into harmonious balance.

My only problem with this dish is one that I commonly have: my understanding of the heat level of chilies and other spices can sometimes be off the mark.  Way off.  Yes, I thought the red jalapeños weren’t quite enough, so a rogue Aurora chili pepper got minced in as well.  And then I decided to use the hot paprika instead of the sweet.  And I tossed in a cavalier pinch of cayenne for good measure.

The result was a fantastically complex and building heat that might actually have been perfect, were it turned down about two notches.  As it was, a small bowl of cooling yogurt was a necessary condiment to even make it through one plate.  It was that spicy.  I loved it.

But, being kind to the others in my household meant that the mole couldn’t be served in that form again.  (The recipe has also been amended to give a more reasonable heat.)  Leftover mole, then, was whizzed in the food processor into a sort of spicy, dark pesto that was simply outstanding on penne and gemelli pasta.  Yogurt may have also been necessary here, for some; unnecessary though I found it, I used it all the same for the creaminess it gave the dish.

The truly remarkable thing about the dish was how long we ate at it before it disappeared.  The original mole served three or four meals, and the resurrected “pesto” served at least six meals.  It really was a loaves-and-fishes kind of situation.

mole pesto on gemelli with goat cheese and parsley

In both iterations, though, the mole was hugely flavorful, bold and full of the rich tones achieved only through slow cooking.  Chocolatey, too, but not in a saccharine brownie-fudge-cake way; only the deep savory notes shone through.  The next day, it was even better after the flavors had properly melded (though still extremely spicy).

These fantastic dishes are part of the reason I love treating myself to new produce, to stepping outside of my culinary comfort zone from time to time.  No, I’m probably not about to start making moles every night, or even cooking fresh beans every day; but now I understand them a little more, and I’ll probably jump at the chance to buy fresh beans whenever I see them in the store.  My world is now a little bigger, a little more flavorful, a little more adventurous.

And all from a few simple beans.

Baked Cranberry Bean and Butternut Squash Mole
Makes between 4 and 5000 servings
Adapted from Wild Garlic, Gooseberries, and Me, by Dennis Cotter, via 101 Cookbooks

If you’re preparing the Basic Cooked Cranberry Beans (see below) for this recipe, you’ll have the white bits of the leeks left over.  You should absolutely use those, washed well and chopped, in this sauce, either in lieu of or in addition to the onion.  If you want to make the “pesto” with any leftovers, you may want to thin the purée with a bit of liquid, such as the water an accompanying pasta is cooked in.

1 small butternut squash (about 1 1/2 pounds), peeled, seeded, and chopped into 1/2 inch cubes
1 tablespoon olive oil
1 tablespoon rendered bacon fat (or butter, or olive oil)
1 medium onion, chopped
2 stalks celery, chopped
2 jalapeño peppers, preferably red, seeds removed, minced
4 cloves garlic, minced
1 splash Bourbon (or white wine)
1 tablespoon tomato paste
1 tablespoon sweet paprika
1 bay leaf
2 cups vegetable or chicken broth
1 1/2 ounces pecans, chopped finely or ground in a food processor
1 1/2 to 2 ounces unsweetened chocolate, chopped
1 tablespoon honey
1/2 recipe (about 8 ounces) Basic Cooked Cranberry Beans, recipe below (or 8 ounces canned cannellini beans)
Salt and pepper, as needed
Goat cheese, for serving (optional)
Chopped fresh parsley, for serving (optional)

1.  Preheat oven to 400º F.  Prepare the butternut squash.  Toss the cubes with the olive oil, and season lightly with salt and pepper.  Spread into a single layer, and roast for 15 minutes, or until softened and beginning to color.  Remove from oven and let cool slightly.  Reduce heat to 325º F.

2.  While squash roasts, heat the bacon fat in a medium pan over medium-high heat.  Add the onion and celery, and cook for 5 minutes, or until softened.  Reduce heat to medium-low, add the jalapeños, and cook until lightly caramelized, 20 to 30 minutes, stirring often.

3.  Add the minced garlic and cook until fragrant, 1 to 2 minutes.  Increase heat to medium.  Deglaze the pan with the Bourbon, scraping the pan to release any brown bits.  Add the tomato paste, paprika, and bay leaf, stirring to combine.  Sprinkle with a bit of salt and pepper.  Add the broth, and bring to a simmer.

4.  When broth is hot, add the ground pecans, chocolate, and honey, stirring until chocolate melts.  Add the cooked beans and the roasted squash.  Remove from heat.  Taste, and correct seasoning as needed with salt, pepper, and honey.

5.  Pour mole into a ceramic baking dish, and cover.  Bake for about 1 1/2 hours.  Let cool briefly before serving, with rice, polenta, tortillas, potatoes, or similar.  Top with crumbled goat cheese and chopped fresh parsley, if desired.  Yogurt is good on top as well.

Basic Cooked Cranberry Beans
Makes about 1 pound (or 3 cups) cooked beans

I don’t specify in this particular recipe what may be done with either the broth or the beans, but both are so flavorful that I don’t think you’ll have many problems finding uses.  Use the broth in most places you would use chicken or vegetable stock (it will be rather cloudy); see above for a recipe for the beans.

5 or so stems fresh parsley
2 to 3 stalks fresh thyme
2 bay leaves
1/2 teaspoon whole black peppercorns
5 dried pequin peppers (optional, also may substitute other small dried chili peppers)
5 whole juniper berries (optional)
3 whole allspice berries
1 onion, peeled and quartered
2 stalks celery, chopped roughly
Green tops from 1 bunch leeks (save whites for another use), washed well
2 pounds fresh cranberry beans in pods, shelled and rinsed

1.  In a triple-thick layer of cheesecloth, tie up the parsley, thyme, bay leaves, peppercorns, peppers, juniper, and allspice into a bouquet garni.  Twine may be used, or simply tie the corners of the cheesecloth together.

2.  Place bouquet garni and all remaining ingredients into a 5 to 6 quart pot, and cover with cold water.  Bring just to the boiling point over high or medium-high heat, then reduce heat to maintain a simmer, over medium-low or low.

3.  Simmer uncovered for about 15 minutes, or until beans are fully cooked.  If unsure, cut a bean in half.  If the center looks chalky and white, continue cooking another 5 minutes or so, until beans are done.

4.  Using a strainer, lift out leek tops, onion, celery, and bouquet garni.  Discard.  Strain beans from broth with either a colander or strainer, reserving both.